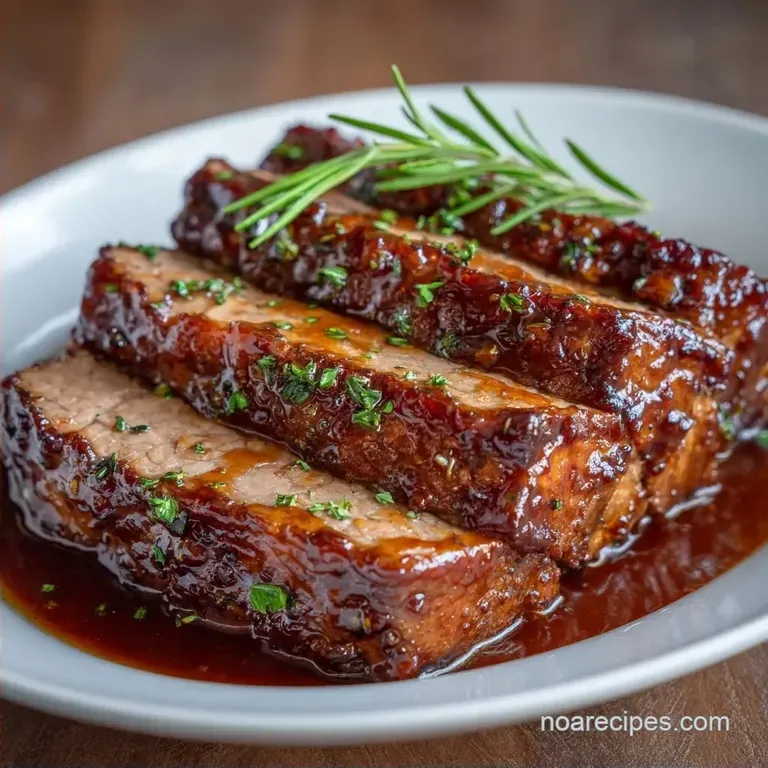
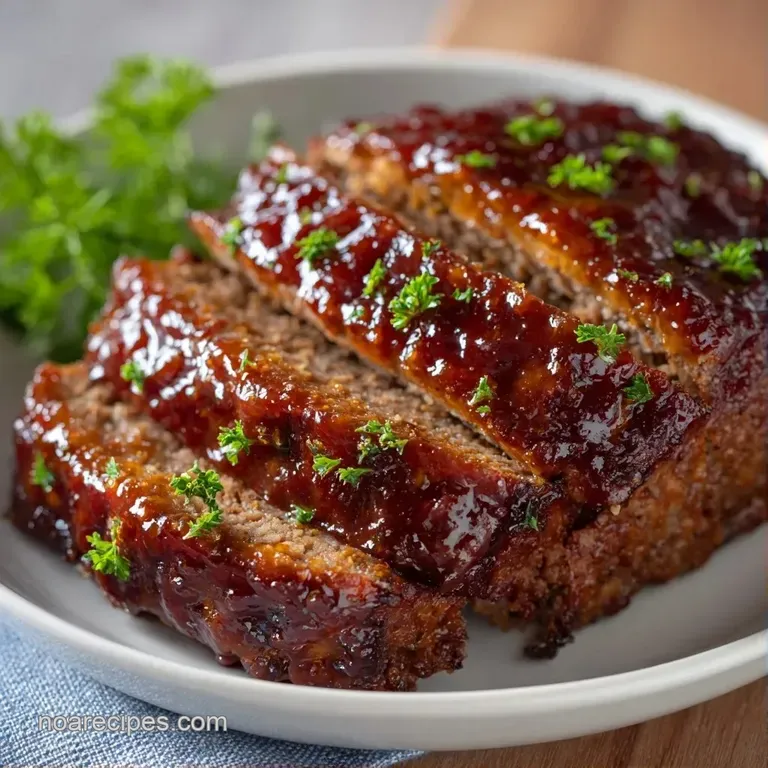
Classic Meatloaf: Moist and Juicy
- Time:15 minutes active + 50 minutes baking
- Flavor/Texture Hook: Sticky, tangy glaze with a velvety interior
- Perfect for: Stress free family dinners or cozy Sunday meal prep
- Making the Best Classic Meatloaf
- The Secret to Success
- Component Analysis
- Ingredients You'll Need
- Step-by-Step Instructions
- Fixing Common Problems
- Troubleshooting Common Issues
- Creative Twists and Swaps
- Adjusting Your Batch Size
- Meatloaf Truths
- Storage Guidelines
- Serving Your Slices
- High in Sodium
- Recipe FAQs
- 📝 Recipe Card
Making the Best Classic Meatloaf
That smell of browning beef and tangy, caramelized sugar hitting the oven air is just... it's instant nostalgia. It reminds me of those rainy Tuesdays when the house felt warm and safe. But for the longest time, I actually struggled with this dish.
I used to treat the meat like pizza dough, kneading it with everything I had, thinking I was making it "sturdy."
The result was a disaster. I once served a loaf that was so dense it practically bounced off the plate. My husband actually joked that we could use it as a doorstop. I realized then that the secret isn't in how hard you work the meat, but in how much you leave it alone. Once I stopped over mixing, everything changed.
Now, this Classic Meatloaf is my go to for a reason. It's stress free, the kids actually eat the onions because they're diced so small, and it tastes like a hug on a plate. We're talking about a juicy, tender center topped with a glaze that gets all sticky and tacky in the oven.
It's the kind of meal that makes everyone actually sit at the table together.
The Secret to Success
Ever wonder why some loaves are like clouds and others are like rubber? It's not magic, just a few simple things happening in the pan. To get this Classic Meatloaf just right, we have to respect the ingredients.
The Fat Buffer: Using 80/20 beef means the fat melts during baking, creating little pockets of moisture. According to Serious Eats, the fat content is the primary driver of flavor and tenderness in ground meat dishes.
The Binder Balance: Milk and breadcrumbs create a "panade" that prevents the protein fibers from tightening up too much. This keeps the texture velvety instead of rubbery.
The Glaze Layering: Adding the glaze twice creates a thick, lacquered crust. The first layer bakes into the meat, and the second layer stays bright and sticky.
Gentle Handling: Mixing only until "just combined" prevents the meat from becoming too compact. If you overwork it, you're basically making a giant, beefy sausage.
Carryover Heat: Removing the meat at 160°F allows the internal temperature to rise naturally. This ensures the Classic Meatloaf stays juicy without drying out.
| Method | Time | Texture | Best For |
|---|---|---|---|
| Oven (Standard) | 50 minutes | Consistent, tender | Large families, traditional feel |
| Stovetop Sear | 65 minutes | Crusty edges, rich | Extra flavor, smaller batches |
Component Analysis
Before we dive into the mixing, let's look at what's actually doing the heavy lifting in your Classic Meatloaf. Not every ingredient is just for taste; some are there for the structure.
| Ingredient | Science Role | Pro Secret |
|---|---|---|
| 80/20 Beef | Flavor & Moisture | Don't go leaner than 85/15 or it'll be dry |
| Eggs | Protein Bridge | Beaten well to distribute evenly |
| Milk | Hydration | Whole milk adds a richness that skim can't match |
| Breadcrumbs | Moisture Trap | Seasoned crumbs add depth without extra measuring |
Ingredients You'll Need
I've found that using specific ingredients makes a world of difference. Don't be tempted to use low-fat substitutes here, as they'll strip the soul right out of the dish.
For the Meatloaf Base
- 2 lbs ground beef (80/20 ground chuck) Why this? Balance of flavor and moisture
- 1 cup seasoned breadcrumbs Why this? Acts as a binder and adds salt/herbs
- 2 large eggs, beaten Why this? Holds everything together
- 1/2 cup whole milk Why this? Keeps the meat tender
- 1 small onion, finely diced Why this? Subtle sweetness and moisture
- 3 cloves garlic, minced Why this? Sharp, aromatic punch
- 2 tbsp Worcestershire sauce Why this? Umami depth
- 1 tsp salt Why this? Basic flavor enhancer
- 1/2 tsp ground black pepper Why this? Mild heat
- 1 tsp dried parsley Why this? Fresh, herbal note
For the Tangy Glaze
- 1/2 cup ketchup Why this? Sweet and tomatoey base
- 2 tbsp brown sugar Why this? Caramelization
- 1 tbsp apple cider vinegar Why this? Cuts through the richness
- 1 tsp Dijon mustard Why this? Adds a subtle tang
Substitution Table
| Original Ingredient | Substitute | Why It Works |
|---|---|---|
| Seasoned Breadcrumbs | Panko Breadcrumbs | Lighter texture. Note: Add 1/2 tsp extra salt |
| Whole Milk | Heavy Cream | Even richer. Note: May make loaf slightly softer |
| 80/20 Ground Beef | Ground Turkey (85/15) | Leaner alternative. Note: Add 1 tbsp olive oil for moisture |
| Apple Cider Vinegar | Red Wine Vinegar | Similar acidity. Note: Slightly more pungent flavor |
Right then, once you've got your ingredients laid out, it's time to get your hands dirty. I always suggest washing your hands with a bit of lemon juice first, as it helps get rid of that lingering beef smell.
Step-by-step Instructions
Let's get this Classic Meatloaf moving. I like to break this down into phases so you can manage your kitchen space.
Phase 1: The Quick Mix Prep
- In a large bowl, whisk together the beaten eggs, milk, Worcestershire sauce, salt, pepper, and dried parsley. Note: Doing this first ensures the seasoning is evenly distributed.
- Stir in the finely diced onion and minced garlic. Note: Mix them into the liquid so they don't clump in the meat.
- Add the ground beef and seasoned breadcrumbs to the bowl.
- Gently combine the ingredients using your hands or a fork until just incorporated. Stop the moment you don't see any more dry crumbs. Note: This prevents the "brick" texture we talked about.
Phase 2: Shaping and First Glaze
- Preheat your oven to 350°F (175°C).
- Press the meat mixture gently into a greased 9x5 inch loaf pan or shape into a uniform log on a rimmed baking sheet. Note: A baking sheet allows for more surface area for the glaze.
- In a small bowl, whisk together ketchup, brown sugar, apple cider vinegar, and Dijon mustard until smooth.
- Spread approximately one third of the glaze evenly over the top of the meatloaf.
Phase 3: The Roast and Final Finish
- Bake for 45–50 minutes.
- At the 35 minute mark, remove the loaf from the oven and spread the remaining glaze over the top, allowing it to drip down the sides. Note: This creates those gorgeous, sticky ribbons of sauce.
- Continue baking until an instant read thermometer reaches 160°F (71°C) in the center. According to the USDA Food Safety guidelines, this is the safe temperature for ground beef.
- Remove from the oven and let the Classic Meatloaf rest for 10 minutes before slicing. Note: Slicing too early lets all the juices run out onto the board.
Chef's Note: If you're using a baking sheet instead of a pan, don't be afraid of the "wings" (the ends of the loaf). They get the most caramelization and are usually the first parts to disappear!
Fixing Common Problems
Even for us cooking obsessed folks, things go sideways sometimes. The most common issue with a Classic Meatloaf is usually related to texture or grease.
Troubleshooting Common Issues
| Issue | Solution |
|---|---|
| Why Your Loaf Is Falling Apart | This usually happens if there isn't enough binder or if the meat was too wet. If your onions were watery or you used too much milk, the structure fails. |
| Why the Texture Is Rubbery | You likely over mixed the meat. When you work the beef too much, the proteins bond too tightly, turning a tender dinner into something reminiscent of a rubber ball. |
| Why There's Too Much Grease | Using beef leaner than 80/20 is actually a mistake, but using something like 70/30 can leave a lake of oil. If you see too much fat, just carefully spoon it out of the pan before serving. |
Common Mistakes Checklist
- ✓ Did I stop mixing the moment the ingredients combined?
- ✓ Is my oven actually preheated to 350°F?
- ✓ Did I use an instant read thermometer instead of guessing?
- ✓ Did I let the meatloaf rest for a full 10 minutes?
- ✓ Are the onions diced small enough to blend in?
Creative Twists and Swaps
Once you've nailed the base, you can start playing around. This Classic Meatloaf is like a blank canvas for flavor.
If you want something with a bit more punch, you can try a Worcestershire meatloaf which leans harder into that savory, salty profile. I've also found that adding a tablespoon of smoked paprika to the meat mixture gives it a subtle "grilled" taste even though it's coming out of the oven.
For those who love cheese, you can make a "Cheeseloaf" by stuffing a stick of mozzarella or some sharp cheddar cubes into the center of the log before baking. Just be careful when slicing, as the molten cheese will want to slide right out.
If you're looking for a different portion size, you might want to check out my Beef Meatloaf which is scaled differently for smaller groups.
Decision Shortcut
- If you want a smoky flavor → add 1 tbsp smoked paprika to the beef.
- If you want a hidden veggie boost → add 1/2 cup finely grated carrots.
- If you want a spicy kick → add 1 tsp sriracha to the glaze.
Adjusting Your Batch Size
Scaling a Classic Meatloaf isn't always a straight multiplication game. The physics of the oven change depending on how much mass you're heating.
Scaling Down (1/2 Batch)
When you halve the recipe, use a smaller loaf pan (like a 4x8) or shape a smaller log. Reduce your baking time by about 20%, but still rely on that thermometer. For the egg, beat one large egg in a small bowl and use exactly half of it to keep the binder ratio correct.
Scaling Up (2x Batch)
If you're feeding a crowd, don't just make one giant loaf. It'll be raw in the middle and burnt on the outside. Instead, make two separate loaves. Be careful with the salt and spices; I usually only increase those to 1.5x rather than 2x, as they can become overwhelming in larger volumes.
For the baking process, if you have two loaves in the oven, you might need to lower the temperature to 325°F and extend the time by 10-15 minutes to ensure the heat circulates properly around both.
Meatloaf Truths
There are a few things people tell you about meatloaf that just aren't true. Let's set the record straight.
Searing the meat before baking doesn't actually "seal in the juices." That's a total myth. Moisture loss happens regardless of whether you sear it or not. Searing just adds a bit of extra flavor through browning. It's a nice touch, but don't feel like you're ruining your Classic Meatloaf if you skip it.
Another common misconception is that you need to use very lean beef to avoid a greasy loaf. In reality, lean beef is the enemy of a tender meatloaf. The fat is what carries the flavor and keeps the meat from feeling like a dry sponge. Stick with the 80/20 ratio.
Storage Guidelines
A Classic Meatloaf is one of those rare dishes that actually tastes better the next day. The flavors have more time to mingle, and the texture firms up for easier slicing.
Fridge Storage: Keep your slices in an airtight container for up to 4 days. I recommend slicing the loaf before storing it; it makes reheating individual portions much faster.
Freezer Storage: You can freeze a fully cooked Classic Meatloaf for up to 3 months. Wrap individual slices in parchment paper and then place them in a freezer bag. To reheat, just pop a slice in the microwave for 60-90 seconds or warm it in a skillet with a tiny bit of butter.
Zero Waste Tips: Don't you dare throw away those end pieces! I love using leftover Classic Meatloaf for "Meatloaf Sliders." Just slice the ends, sear them in a pan until they're crispy, and put them on a brioche bun with some melted provolone and a dollop of the leftover glaze.
You can also crumble cold meatloaf into a skillet with some diced potatoes for a killer breakfast hash.
Serving Your Slices
The way you present a Classic Meatloaf can take it from "weekday dinner" to "special occasion" in about two minutes.
The Perfect Slice To get those clean, restaurant style slices, use a serrated knife. Gently saw through the loaf rather than pressing down hard, which can squish the meat. If you let the loaf rest for the full 10 minutes, the slices will stay intact and look beautiful on the plate.
Best Side Dishes Since the loaf is rich and tangy, you need sides that offer a bit of contrast. A pile of garlic mashed potatoes is the traditional choice, but I've been loving a crisp, vinegary coleslaw or some roasted honey glazed carrots.
The acidity of the slaw cuts right through the richness of the beef.
Plating Pro Tip Spoon an extra tablespoon of the glaze over each individual slice right before serving. It gives it a fresh, glossy look and adds one last hit of that tangy flavor. Serve it on a warm platter to keep the meat from cooling down too quickly.
Right then, you're all set! This Classic Meatloaf is more than just a meal; it's a bit of comfort and a lot of flavor. Don't stress over the perfect shape or the exact color of the glaze just focus on the flavors and the people you're sharing it with.
Get in there, get your hands messy, and enjoy every bite of this Classic Meatloaf. It's the ultimate stress free dinner that never fails to satisfy. Happy cooking!
High in Sodium
810 mg 810 mg of sodium per serving (35% 35% of daily value)
The American Heart Association recommends a daily limit of 2,300 mg of sodium to lower blood pressure and reduce the risk of heart disease.
Tips to Reduce Sodium
-
Eliminate Added Salt-25%
Remove the 1 tsp of salt completely; the savory notes from the Worcestershire and mustard will still provide a bold flavor.
-
Switch Breadcrumbs-20%
Replace seasoned breadcrumbs with plain panko or homemade breadcrumbs to avoid the high sodium levels found in pre-seasoned mixes.
-
Use Low-Sodium Sauces-20%
Substitute the standard ketchup and Worcestershire sauce with low-sodium versions to cut down on processed salt.
-
Modify the Mustard-15%
Swap the Dijon mustard for a low-sodium variety or use a small amount of extra apple cider vinegar for acidity.
-
Enhance Fresh Aromatics
Increase the amount of fresh garlic, diced onion, or fresh parsley to add depth and flavor without adding any sodium.
Recipe FAQs
What is the secret to the best meatloaf?
Avoid overworking the meat. Gently combining the beef and breadcrumbs prevents proteins from bonding too tightly, which keeps the texture tender rather than rubbery.
How do you cook a beef meatloaf?
Preheat your oven to 350°F (175°C) and shape the mixture into a log. Bake for 45 50 minutes, applying the glaze at the start and again at the 35-minute mark until the center reaches 160°F.
How to make meatloaf more interesting?
Apply a tangy, multi ingredient glaze. Whisking together ketchup, brown sugar, apple cider vinegar, and Dijon mustard adds a complex flavor profile. If you enjoy this sweet savory balance, see how it works in our Mongolian Meatballs.
What is the one ingredient upgrade for better meatloaf?
Use 80/20 ground chuck. This specific fat ratio ensures the loaf remains juicy and flavorful without releasing too much grease during baking.
How to make meatloaf for diabetics?
Omit or reduce the brown sugar in the glaze. You can rely on the ketchup and Dijon mustard for flavor to keep the sugar content lower.
Is it true that you should knead the meat until it is smooth?
No, this is a common misconception. Over mixing the beef creates a dense, rubbery texture; you should only stir until the ingredients are just incorporated.
Why is my meatloaf falling apart?
Your binder or moisture levels are likely off. Too much milk or watery onions can weaken the structure, causing the loaf to crumble when sliced.
Classic Meatloaf Recipe

